Setting up your new interchangeable-lens camera
Congratulations on your new camera! Whether it’s a DSLR or a mirrorless compact system camera, I’m sure you chose an interchangeable lens camera to get better quality photos, and hopefully to have a little more control over how your pictures come out. So, let’s cover some basic items to get you started!
Battery Basics
 The first thing to do is to charge your battery. There may be some power in it right out of the box, but before you start it’s best to make sure it’s fully charged. With the modern batteries you don’t need to worry about draining the battery before charging it. Just put it on the charger, and check the instructions to see how to tell when the battery is done. I’d also suggest picking up a spare battery. Keep a charged spare in your bag, and you can be sure you won’t run out of power at the wrong time. If your battery sits for a month or more between uses, pop it on the charger the day before you’ll need it so it gets back to a full charge.
Once you power up the camera, be sure to set the time and date. It may not seem important at first, but every photo you take is tagged with the date and time it was taken. Making sure that info is correct will make organizing your photos much easier later on.
Lens Tips
When attaching or changing lenses, be sure to turn the camera off first, to safeguard the electronics inside. Also, since the sensor is electrically charged when it’s powered on, this will help prevent dust from being attracted to (and sticking to) the sensor. I always suggest tilting the camera body so it faces downward when there’s not a lens attached, to help prevent dust particles from falling into the camera and finding their way to the sensor. While just about every model now has a dust reduction system, you can help it out by avoiding as much dust as possible.

Memory Cards
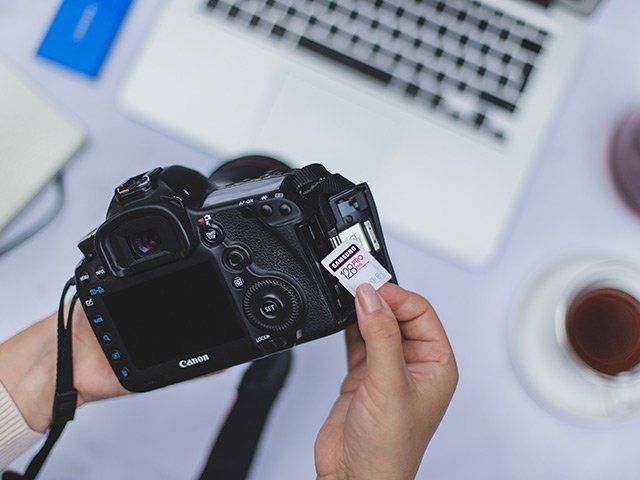
 When you first insert a memory card, it’s best to format it. That will erase everything on the card, so if it’s not a brand new card, be sure to back up the photos to your computer before formatting. In your menu (probably under a “wrench” symbol, or some other tool) should be the FORMAT
option. You will have to say “yes” to a warning that everything will be erased. Formatting the card is also a good idea after several sessions of shooting (again, after backing up your photos!). Formatting the card not only erases the photos, it also resets the controller, the electronic brain of the card. When you shoot a bunch of photos and then delete a few, over and over, you increase the risk of your card locking up. Formatting, rather than just deleting, helps prevent that from happening. As with taking the lens off, be sure the camera is powered off before removing or inserting a memory card.
When you first insert a memory card, it’s best to format it. That will erase everything on the card, so if it’s not a brand new card, be sure to back up the photos to your computer before formatting. In your menu (probably under a “wrench” symbol, or some other tool) should be the FORMAT
option. You will have to say “yes” to a warning that everything will be erased. Formatting the card is also a good idea after several sessions of shooting (again, after backing up your photos!). Formatting the card not only erases the photos, it also resets the controller, the electronic brain of the card. When you shoot a bunch of photos and then delete a few, over and over, you increase the risk of your card locking up. Formatting, rather than just deleting, helps prevent that from happening. As with taking the lens off, be sure the camera is powered off before removing or inserting a memory card.
If you didn’t buy your camera from Dan’s, make sure that the memory card you got is at least a Class 10 card. Often times, kits or bargain priced cards are slower in their ability to read or write data. Class 2 or 4 cards are fine for digital frames, but they slow down a new high resolution DSLR. A Class 6 card will probably be fine if you’re not doing burst shooting or video. The card should have its rating on the front, usually inside a letter C. If your card has U on it, then it is even better than a Class 10 and you’re in great shape for anything you can throw at it.
Image quality settings
Out of the box, your camera is set to give good results in most situations, so you don’t need to dig too far into the menus right away. Two settings you may wish to check before you do a lot of shooting though, are the image size and image quality. Most cameras come set to give you the largest file size (highest resolution) and moderate JPEG image compression quality. Compression allows the camera to reduce the size of your files. More compression means you can fit more pictures on your memory card, but that reduction in size comes at the cost of image quality. Memory cards are inexpensive enough now that it doesn’t make much sense to use anything but the best image quality your camera can produce. Pick the largest image size and the best image quality. You can always make a smaller version later to email or share online, but a large high-quality file will give you the best results when you make prints or do anything else with your pictures later.
Unless you’re familiar with shooting and processing RAW files, stay away from that setting for now. RAW files are the unprocessed data captured by the camera, they need to be converted into an image format in your computer to do anything useful. The JPEG files your camera produces are the result of processing that raw data. If you start with a RAW file yourself you can have more control over how that image is made, rather than letting the camera do it, but you need special software on your computer, not to mention the extra time and effort to do so. If you’re interested in the extra control that the RAW format can give you, we have classes and special deals on software to help you out!

Protecting your lens
Hopefully, you also got a protective filter for your lens. If not, it’s time to pick one up. The better grade filters may make a slight improvement to some of your photos, but the real reason to have one is to give your lens some extra protection from scratches and other damage. Be sure to put it on before you venture off to start shooting. If the filter gets scratched or cracked, it’s much cheaper to replace than the whole lens!
Depending on the lens you have, it may have also come with a lens hood. I strongly recommend these- they improve your photos by preventing stray light from hitting your lens, which results in “lens flare” in your pictures. I’ve seen those hoods save a lens from damage, too. Having that extra “bumper” of plastic or metal out in front can make a big difference. Not all companies include them, so if you didn’t find one in the lens box be sure to pick one up. They’re inexpensive, protect your lens, and help give you better pictures.
Protecting the screen

For protecting your LCD screen on the back, there’s a couple options. For a few bucks you can use a thin plastic film to prevent minor scuffs. For just a little more, we have a solid optical plastic option which also helps protect from most types of impact. Both styles attach to the viewscreen with a firm yet removeable adhesive. If you have a model with a touch screen, don’t use a hard plastic screen protector! You’ll have to go with the thin film version.
Some tips for when you’re ready to start shooting
On your main mode dial, you’ll probably see a shooting mode like AUTO , or a green rectangle. That locks the camera in a full-automatic mode. It’s a good starting point, though you may get better results using some of the other options. Most cameras also offer Scene Modes, which let you to tell the camera what kind of pictures you’re taking. When the camera knows what you’re trying to do, it can do a better job of adjusting its settings to help you get great pictures. To get at the Scene Modes, look for ‘Scene’ or ‘SCN’ on the dial. Then you can browse through the options, which usually include Portrait, Sports, Landscape, and probably some others, too. There’s probably also a mode labeled “P”. That’s still an automatic setting, but it lets you change some settings for a little more control without getting into too much extra work. Try out all of these settings in different situations, and see what they look like! You can read all about each of them in detail, but there’s no substitute for getting out there and taking some pictures. Experiment, change some things, take some more pictures, and see what you like and what you don’t.
There’s a lot that goes into making really great pictures. I invite you to stop by and ask one of our photo experts to review your camera’s options with you. Naturally, our classes can take you even further, and now with our Click2Learn online courses you have access to our learning resources 24/7.
Using your flash
In full-auto mode, your flash will probably pop up on its own when it’s needed. Keep in mind the built-in flash is ok, but it’s not intended to be your primary indoor flash. These tiny flashes are mainly for convenience. They can act as a fill flash outside, and on some models they can even be used to remotely control other flashes. But because they’re so small, they create a very harsh light which isn’t exactly the most flattering for pictures of people. (There’s a reason you never see a wedding photographer using the built-in flash!) An external flash that you attach to your camera can make a big improvement in your pictures, especially indoors. And they don’t need to be large or expensive. Check with our Equipment Specialists for options for your camera. Most flashes can be used to produce a softer, more flattering light, either by bouncing them off the ceiling or adding some type of diffuser or other light modifier.
Getting connected
 After you’ve taken your pictures, you’ll need to transfer them to your computer. All cameras come with a USB
cord to do that, but I really recommend getting yourself a memory card reader. They’re cheap, they usually make the transfer go faster, and they don’t tie up your camera while you’re moving the files. You might also want a connector to copy photos to your iPad or tablet as well. Dan’s has iPad connectors for under $10, which will use almost any type of memory card as well as providing a USB
port.
After you’ve taken your pictures, you’ll need to transfer them to your computer. All cameras come with a USB
cord to do that, but I really recommend getting yourself a memory card reader. They’re cheap, they usually make the transfer go faster, and they don’t tie up your camera while you’re moving the files. You might also want a connector to copy photos to your iPad or tablet as well. Dan’s has iPad connectors for under $10, which will use almost any type of memory card as well as providing a USB
port.
While many newer cameras have WiFi, some models that don’t can take an accessory which will provide the same functionality, which can be very handy for transferring and sharing your photos. Each model has slightly different capabilities with its WiFi connection, but the general idea is to be able to move your photos right to your smartphone for instant sharing.
Another great way to share your photos is to display them on your HDTV. Your TV is probably in the comfort of the family room, and it’s likely much larger than a computer screen. With an inexpensive HDMI cable that connects your camera to your HDTV , you can show off your photos and movies in all their high-definition splendor.

Working with your pictures
Finally, and you’ll need to think about how you’ll organize all the photos you’re going to capture. This is an important one! With a good organization and archiving system, all your memories will be accessible and safe for years to come. But without planning ahead, it’s easy for photos to get lost in endless folders of pictures on your hard drive, or worse, lost forever in a computer crash. Depending on your computer setup, there are a lot of options. Software such as Adobe Photoshop Elements and Google Picasa offer organization options. If you don’t have a good working system, talk with our experts to find a solution that will work for you. And make sure you have a backup plan! It could be as simple as an external hard drive and some backup software, or copying your files to DVDs after you import them from your camera, or whatever else works for you, just as long as you don’t rely on only one computer’s hard drive.
When you have a question, or wish you knew how to get a different result, please stop by. Bring in your camera, and bring some of the photos you wish were different on the camera’s memory card so we can take a look at exactly what you’re getting. You have a powerful tool, now let’s make sure we get you the knowledge and techniques so that your results are exactly what you’re hoping for. You can contact the Dan’s staff at info@danscamera.com or you can reach me directly at mike@danscamera.com. And remember, for better memories, take pictures!


USEFUL LINKS
SOCIAL MEDIA